
Today’s incredibly advanced technology makes it quite the challenge to continue to surprise audiences, but there certainly is one form of entertainment that never ceases to wow: projection mapping. Having come a long way over the decades, it has evolved from a simple show of lights into an all-around interactive, immersive form of artistic expression that gives any surface of any object a new life.
If you have seen last week’s mega collection of show-stopping projection mapping jobs done by members of the AV Alliance, you will agree that mapping is still as versatile and captivating an effect to enhance any event with as it has ever been, due to the continuous technical advancements in projection technology. We have also explored the various examples as to how it can be used to turn all kinds of surfaces into canvases, painting massive façades or entire buildings, planes or dinner tables, or even monuments and nature itself with lights and captivating imagery.
From ballrooms to landmarks, today’s 3D projection mapping is combined with specialized software that is able to spatially map any three-dimensional object with custom design, software that seamlessly blends images by multiple projectors to cover surfaces of immense proportions, and even a single projector can map different surfaces with several sources of video. With the right technology, nothing is impossible.
As always, it starts with an idea – and in this case, it can be as outlandish as they come. Between the idea and concept, and the execution and showtime, there are a number of steps that need to happen in order to deliver a stunning projection mapping job, and that includes selecting the best software and set-up. In this article we will cover how to choose the right kind of equipment that is needed to take the project from ordinary to extraordinary.
So what exactly do you need for a high-end projection mapping job?
Projection mapping magic at ISE 2017: Panasonic introducing the PT-RZ21K to its large venue projector range
Define the projection system by surface size and type
What does this mean?
Before you select the right projectors for the mapping job, there are some important considerations that you must not skip: what will be the scale of the content you want to use? What will the surface be that you wish to project on and how large that object is? Is it a flat surface or does it have geometric dimensions? Depending on what you have in mind for your projection mapping, the system design – the types and number of projectors used, edge blending, geometry correction, software usage, etc. – needs to be specifically adapted to it.
We have to emphasize that technical considerations should not hamper the initial creative process of creating the concept behind your projection mapping, and the size and shape of the building or object that you wish to project onto. Once you have dreamed up what you want your project to look like, your professional AV provider will review the design and configure the projection system type, the number of projectors, and the exact set-up with the concept in mind, and draw up the costs based on that.
How does the object shape and size influence the projection?
According to our sponsoring partner Panasonic‘s superbly comprehensive white paper on the subject, projection mapping can be categorized based on how the design of the projection system is influenced by the object that essentially becomes your surface:
- Non-traditional aspect ratio: a screen surface that does not correspond with standard aspect ratios, for instance a custom-built screen backdrop in a conference room. The unusual size or non-standard ratio means that you may need to use multiple projectors to do the job, as well as a technique that is known as edge blending, which the process of visually combining several projected images and blending them seamlessly into one image.
- Curvilinear shape: a curved screen with a radius arc (convex or concave) which may require more than one projectors and “simple geometry correction depending on the aspect ratio”.
- Defined by object: when projection mapping is influenced by the object surface that has features such as “multiple planes, arcs, or other geometric shapes and requires advanced geometry correction”. A great example for this mapping physical objects of unusual shape or architecture, such as cars or planes, building façades, monuments, landmarks, etc.
This brings us to the next step of the process, which is choosing the right software for your project!
For this 2019 Région des Lumières projection mapping campaign VIDELIO Events used over 29 Barco UDX projectors and 8 Modulo Pi media servers.
Working with a projection mapping software
When and why is it necessary?
The main purpose of using a software for a mapping project is to enhance what can be done with projectors and create a complex visual experience. Depending on the scale and complexity of the job, projection mapping requires specific software solutions to ensure that the projected imagery fits the target surface in size and shape. While it is quite easy to project a 2D image onto a flat surface, for instance a screen or a blank wall, it is quite a different job to project the same onto a cathedral or an opera house, or even a modern building with distinct architectural features. When it comes to mapping objects with unusual shapes, dimensions, or colors, using software to create and pre-visualize the content and spatially map the design onto any surface is a must.
What does a software do?
In short, the it mimics the real environment the object will be projected on, and interacts with the projector. To be more precise, the software combines all necessary data of the object that ultimately becomes the projection surface, as well as its surroundings, and creates a virtual version of it all. This pre-visualization allows you to see (and plan with) the way the light hits the surface from certain angles, and how the mapped imagery will look like from different perspectives. Serving as a basis for the precise set-up of the equipment, the pre-visualized virtual project will save considerable time for your team.
What is a 3D media server?
A media server is basically a computers with a specially designed software to store and manage the content that is used for projection mapping, and is able to operate multiple projectors at the same time. With their 3D modelling features, virtual positioning, and projection alignment features 3D media servers enable accurate planning for pre-production, and also allow for perfect content positioning on any object or surface with ultra HD resolution output.
Choosing the best projection coverage
Before we dive further into the realm of lux and lumens, let’s tackle something else first that is equally important to understand if we want to find the best possible projector configuration for our mapping project! There are two ways go about creating projected imagery on the surface of our choice, and these will influence the final projector selection (in terms of brightness, resolution, point of projection, number of projectors, etc). These two approaches are what we call single and multiple raster (also called array).
The difference between single and multiple raster
With single raster you use a single projection point for the entire image area, then overlay additional projectors that add brightness until you get the desired optimal result that works best in the given environment. This single raster approach requires careful alignment of all the projectors, but it is much simpler than the multiple raster solution that requires edge-blending.
With the more complicated and complex multiple raster configuration you project an array of images that are blended together into a single image, and this results in a higher image resolution. This edge-blending, or soft-edge masking of the overlapping images is more advanced tan the single raster approach, but with the right projector that should not be an issue.
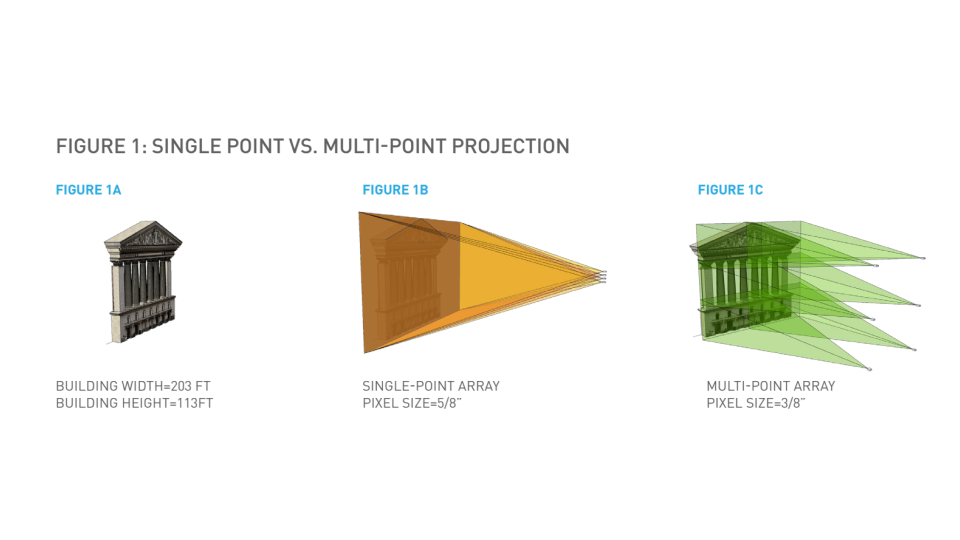
Single and multi-point projection, source: Panasonic
Selecting the right projector
Now that we covered the first steps of how the surface and the content determines the type of projection set-up and system that is required for your mapping job, the importance of using a software that makes it happen, and the projection points and metrics that influence your choice of projectors, let us dive right into the key factors you need to consider when selecting your gear. We turned to our sponsoring partner Barco for some expert advice:
Brightness
There are a number of factors that can determine the minimum required required brightness for 3D projection mapping:
- First and foremost, it is the ambient light conditions of the location where the project takes place. Lux can be lower in darker environment, while higher projection brightness is needed for bright surroundings such as trade show floors, since we do not want the ambient light to outweigh the brightness of your projection.
- The surface material on which you will project your image is also a deciding factor: materials such as metal, glass, fabric, or masonry may decrease brightness or lack diffusion characteristics and thus create hot spots on the surface. Testing the projector well ahead of the project taking place, and observing how the surface reflects light is a great way to determine the level of brightness you will need.
- Brightness also depends on whether you wish to broadcast or stream the mapping project to online audiences. In such cases a higher brightness projector is recommended, which is also beneficial for live audiences if they record the mapping with their cameras and phones.
Which is which?
Illuminance vs. luminance
Often confused, the two are quite different: illuminance refers to the amount of light cast onto a surface of an object and it is measured in lux, which is a basic parameter in the visual quality of projection mapping, meaning that it must be calculated correctly to get every other number right.
By luminance we mean the amount of light passing through the object, and it is measured in lumens.
Lux vs. lumen
Lux is the metric of illuminance, signifying the amount of light (or, in other words, light intensity) that falls on a surface.
Lumen is the measurement of the total output of visible light (in short, brightness) from a light source, in this case a projector. The correct term used in the AV industry is ANSI lumens (ANSI stands for the American National Standards Institute).
One lux is equal to one lumen per square meter (lux = lumens/m2). You can use a lux to lumens calculator to choose the correct settings for your projection mapping!
Contrast ratio
A key factor to consider when choosing the right gear is the projector’s contrast ratio, which is the difference between light (the whitest white) and dark (the blackest black) on a screen. A projector with higher contrast ratio, however, does not automatically mean that it performs that much better than one that has lower ratio, as there are other aspects to consider. A projector with a higher brightness output will perform better against brighter ambient light, but that will still impact the contrast ratio and can change it even if the projector light output remains the same.
Take a look at Barco’s Lens Calculator, which has a built-in contrast simulator that can help you determine which settings you should opt for to get the best results.
Colors
To deliver the same image quality with which the content (image, video, etc.) was designed, the projector you choose and the media server will have to support the specific colors used in that design in order for the image to be displayed correctly. It is also important to factor in the background color of the surface on which the mapping will take place, as it can influence the final output. The lighter the background, the more life-like the colors of the mapping will be, but high-end projectors with higher brightness and life-like color reproduction performance can easily override a darker background. Projectors with a wider color gamut also perform better in brighter ambient light.
Resolution
When choosing a projector for your mapping, the key is to match the resolution to that of the content you will project. Therefore if the input signal is of 4K resolution, then by all means use a 4K projector, but if the content is of lower resolution, those extra pixels will make little difference in the outcome. There is a wide array of projectors available in the market that have the most popular 2K or 4K resolution with aspect ratios of 16:10, 16:9 or 4:3, covering almost all projection needs.
There is one factor, however, that can render the highest input and output resolution less significant, and that is the human eye’s sensitivity relative to viewing distance. This, of course, is influenced by many things, such as the type and the content of the projection mapping: for example with videos the audience is more captivated by the colors and the story, and even the highest resolution is less relevant in comparison to that, while in other cases they can pay more attention to and appreciate 4K images.
Choosing the right projector lenses
It is imperative to pick the correct projector lens to go with the rest of the gear, and by going with the best projector manufacturers you will have a range of high-quality, all-glass lenses for your mapping project. The full range of lenses are the key to flexibility in the design and installation of the setup.
Throw ratio is our key parameter here, or in other words the distance measured from the end of the lens to the projection screen, divided by the width of the image. The minimum required throw distance is defined by the lower end of the focus range of the lens. In order see what options you have, and to properly calculate the specifications for your setup, we suggest using an online guide, such as Barco’s lens calculator or Panasonic’s throw distance calculator!
To learn more about the technical aspects, the necessary equipment, and the related costs of projection mapping, we invite you to get in touch with us and find out what our AV Alliance members can do for you and your event!